Quick Appointment Cards
Run Quick Appointment Cards to easily generate
appointment cards in your most common format.
 Set Up Quick Appointment Card - Before you can print a Quick Appointment Card, you must select the format and options to use.
-
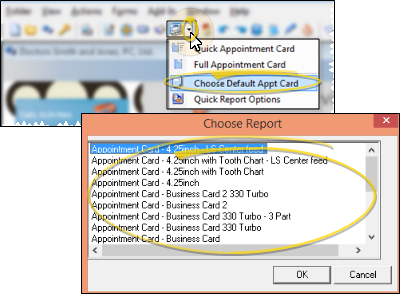
 Choose Default Format - From the ViewPoint toolbar, click the arrow beside the
  Quick Appointment Card icon, and select the appointment card format you want to use as your one-click Quick Appointment Card.

-
 Form Settings - From the ViewPoint toolbar, click the arrow beside the
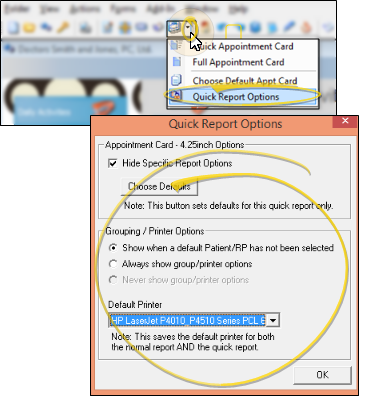
  Quick Appointment Card icon, and select Quick Report Options to choose the options for your selected card.

Hide Specific Report Options - (Recommended.) Enable this option to use the default appointment card settings for your one-click cards. If you disable this option, you will be prompted for appointment card settings whenever you launch a Quick Appointment Card (in effect, defeating the purpose of a one-click card).
Default Options - Click Choose Defaults button to open the settings dialog for the appointment card format you have selected as your default quick appointment card. Then set up the card options as you would like them to function for a one-click card. See "Appointment Cards" for details about the settings available for each appointment card format.
Grouping / Printer Options - Use these options to determine when the report output dialog appears, effectively enabling or disabling the one-click appointment card functionality.
To activate one-click capability - Enable the Show when a default Patient/RP has not been selected option. Then, if you have a patient folder open or a patient is active in your Grid Scheduler when you click the Quick Appointment Card button from the ViewPoint toolbar, the card will print immediately to the default printer (described below), with no further input from you. (As long as the Hide Specific Report Options, describe above, is also enabled.)
However, if a patient folder is not open or active when you click the Quick Appointment Card button, the report output dialog will open for you to select the patient(s) to print for.
To disable one-click capability - Enable the Always show group/printer options option. Then, when you click the Quick Appointment Card button from the ViewPoint toolbar, the report output dialog will always open for you to select the patient(s) to print for, even if a patient folder is already open, or a patient is active in your Grid Scheduler.
Default Printer - Choose the default printer to use for this appointment card format. This is the printer that will be used automatically for you one-click Quick Appointment cards, as well as the default printer for generating this appointment card format by other methods.
 One-Click Appointment Cards - One-click capability is available only if your settings have enabled both the Hide Specific Report Options and Show when a default patient has not been selected options, described above.
-
Open a patient folder, or activate the patient in your Grid Scheduler.
-
Click  Quick Appointment Card in the ViewPoint toolbar. (Or, click the arrow beside the icon, and choose the Quick Appointment Card option.)
The card is printed for the immediately to the default printer, according to your Quick Appointment Card settings.
If a patient folder is not open or active, the report output dialog appears, and you can select to generate the form for an individual patientall patients, or a sub-group. (You can also launch a Quick Appointment Card by clicking the arrow beside the icon, and choosing the Quick Appointment Card option.)
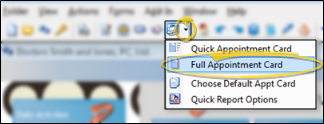
 Full Appointment Cards - Click the arrow beside the
  Quick Appointment Card icon in your ViewPoint toolbar, then select the Full Appointment Card option. You can then define all the appointment card options before generating it for one or more patients. (See "Appointment Cards" for details about your appointment card choices.)

Additional Appointment Card Options - Run Appointment Card forms to generate detailed appointment reminder cards for your patients. The information available for printing
on the card, such as the most recent payment receipt, or a school / work excuse, depends on the style you select. You may also include your office name and address on the form as it prints,
or have your logo pre-printed on special form paper for a more professional appearance. In addition, you may choose to email appointment cards to patients and / or responsible parties, rather than printing them. See "Appointment Cards" for details.
![]() Set Up Quick Appointment Card - Before you can print a Quick Appointment Card, you must select the format and options to use.
Set Up Quick Appointment Card - Before you can print a Quick Appointment Card, you must select the format and options to use.![]() One-Click Appointment Cards - One-click capability is available only if your settings have enabled both the Hide Specific Report Options and Show when a default patient has not been selected options, described above.
One-Click Appointment Cards - One-click capability is available only if your settings have enabled both the Hide Specific Report Options and Show when a default patient has not been selected options, described above.![]() Full Appointment Cards - Click the arrow beside the
Full Appointment Cards - Click the arrow beside the  Quick Appointment Card icon in your ViewPoint toolbar, then select the Full Appointment Card option. You can then define all the appointment card options before generating it for one or more patients. (See "Appointment Cards" for details about your appointment card choices.)


