Post Bulk Payments
Use the Bulk Payment tool to allocate one payment among multiple contracts. For example, you would use the bulk payment tool when you receive an insurance check for several clients, or a parent's check covering multiple siblings.
Watch the movie. (Windows Media Player, an active Internet connection, and a valid Ortho2 customer login are required to run video tutorials, webinars, and training programs.)
-
 Open the Post Transaction Window - You can open this feature in multiple ways: Use the method that's most convenient for you. If a patient record is already active, that patient's information will be loaded automatically. Otherwise, you use Fast Find (either typing information or swiping a registered reward card) to search for the patient to work with.
ViewPoint main menu - Daily Activities > Post Transaction.
 Post Transactions.
ViewPoint shortcut menu - Actions > Post Transaction. (Or, press Alt+A on your keyboard to open the Actions menu options.)


Patient Fingerprint - You can enable patients to open the post transactions window when they touch the fingerprint sensor installed at your workstation. See "ViewPointProperties" for details.
-
Select Patient and Billing Party - Choose the account to work with. If needed, you can to launch Fast Find and choose a different patient. If the patient has multiple responsible parties and / or contracts, select the account holder and contract to use. Insurance contracts are listed directly below the associated subscriber

List Current Phase / List All - By default, only contracts that match the phase on the Patient tab of the patient folder are listed. If the contract you want does not appear, enable the All Phases option to include all contracts for all phases in the list.
Auto Receipt Contract - The AR column at the right of the post transactions window indicates whether the contract is set up with an Auto Receipts agreement.
Next Charge - The far right edge of the contract list at the top of the post transaction screen includes the next scheduled payment date and amount. You might use this information to ask the responsible party for their next payment amount in addition to any miscellaneous charges incurred during the day's visit.
Doctor / Office - The doctor and office that will be credited with this payment appear at the left of the transaction details. Confirm that these are correct before continuing.

-
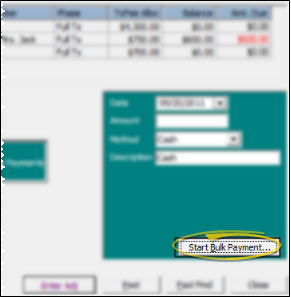
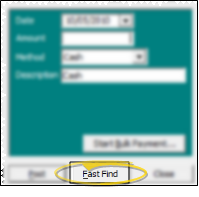
Enable Bulk Payments - Click Start Bulk Payment at the bottomof the Post Transaction window to begin posting a bulk payment.
-
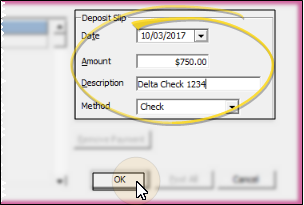
Deposit Slip Details - Enter the transaction details as you want them to appear on your deposit slip. Be sure to enter the entire payment amount here. Then click Ok to return to the transaction window and begin allocating amounts to patient accounts.
-
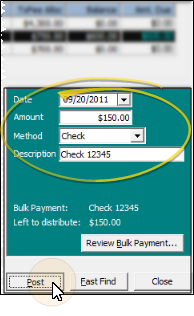
Allocate Payments - Enter the portion of the total bulk payment amount to allocate to the currently selected contract, completing the receipt details fields just as if you were posting an individual payment. You may change the description for each allocated payment, if desired, or leave them all the same as the bulk payment description. Click Post to complete this portion of the bulk payment.
Insurance Payments - If you are posting a bulk payment from an insurance company, be sure to select the insurance contract, which appears just below the responsible party's contract in the billing party list, and includes the responsible party name in the Subscriber column.
-
Select Next Patient - Click Fast Find to locate another patient, continue allocating the bulk payment funds as described above.
-
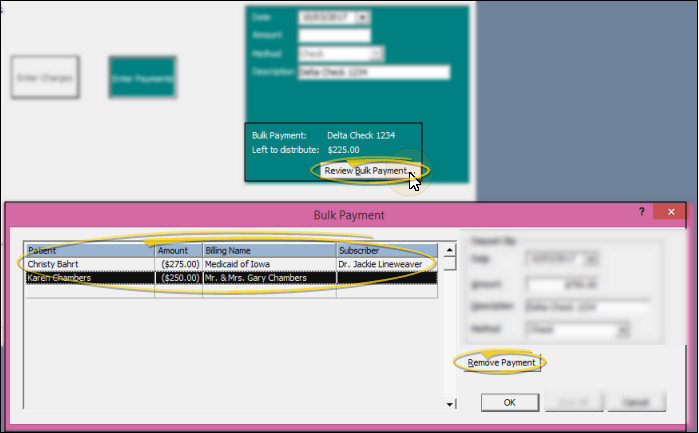
Review Payments - As you enter individual transactions, the progress toward the entire bulk payment appears for your review. In addition, you can click Review Bulk Payment to see the list of individual transactions, and remove those entered in error, if needed.
Insurance Payments - If you are posting a bulk payment from an insurance company, be sure each transaction in the review screen includes the name of the insurance company in the Billing Name column, and the name of the responsible party in the Subscriber column. If the Subscriber column is empty, you did not select the insurance contract for that portion of the bulk payment.
-
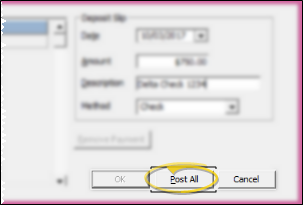
Finalize Bulk Payment - When you enter the transaction that fulfills the bulk payment, ViewPoint takes you to the review window automatically. From here, you can edit bulk payment details, remove individual payments that were entered in error, or click Post All to complete the bulk payment process, posting the individual transactions as you have allocated them.
Bulk Payment Results - After you post a bulk payment, the deposit slip will include a single transaction for the entire bulk payment amount. However, the individual patient's accounts will show only their allocated portion of the bulk payment.
OOPS! - If you find an error after you finalize a bulk payment, correct the mistake by posting a negative receipt and checking the Posting Fix box for the specific transaction. If you instead reverse the transaction in the patient ledger, ALL items in that bulk payment will be reversed.
![]() ViewPoint Videos - Click the
ViewPoint Videos - Click the  Video button from the post transactions window to find topic-specific video assistance. (See "ViewPoint Videos" for details.)
![]()