Use the Edge Animations publisher to save filmstrips in video file format on your computer, upload video files to YouTube or Facebook, or send a link to videos via email.
This article assumes your Edge Animations module is open on your workstation. See "Edge Animations" for details if you need help opening the module.
Get Started
Required Publishing Settings - Before you can publish videos, you must set up the Copy to Publish and History Category options of your Edge Animations settings. In addition, if you want to upload videos to YouTube or Facebook, be sure to enter your account credentials. See "Set Up Edge Animations" for details.
Required Encoding Software - Each computer you use to publish videos must have its own encoder software installed. One license of Microsoft Expression Encoder Pro is included with your purchase of Edge Animations, which allow you access to all Edge Animations publishing options (Publish as MP4, Publish as WMV, Publish via Email, Publish to Facebook, and Publish to YouTube). For additional machines, you can purchase additional licenses for Encoder Pro, or choose to install Microsoft Expression Encoder Free. The free version restricts you to publishing Edge Animations videos as .WMV files, or directly to YouTube. If you have not yet verified the license on your computer when you attempt to publish a video, a Web page will open that describes how to obtain that license.
Use This Feature
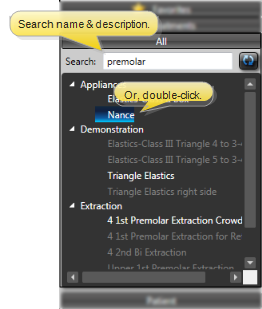
Select / Build Filmstrip - Click Open from the filmstrip viewing area to clear the current filmstrip bar, and open a saved Edge Animations filmstrip. Or, add a filmstrip or patient image from an Edge Animations list to the end of the filmstrip bar. (See "Manage Edge Animations Filmstrip Lists" for details about saving and opening filmstrips.) You can then add additional filmstrips or images before continuing. (See "Build & Save Edge Animations Filmstrips" for details.)
Clear the filmstrip bar and open a saved filmstrip:
Select a filmstrip or patient image to add to the end of the current filmstrip bar.
Initiate Publisher - Click Publish from the filmstrip ribbon bar, then select how you would like to publish your video.
Publish to Disk as MP4 - (Microsoft Expression Encoder Pro required.) Use this option to save the filmstrip as an MP4 video file on your computer that you can view on nearly any device with a media player. After entering a job name and description, the video will be saved to the Output folder of the Data Files location specified in your Edge Animation settings. (See "Set Up Edge Animations" for details.) You can then navigate to the Output folder to view and manage your new video. In addition, you can add Edge Animations videos that you have published to your patient sign-in screen. (See "Set Up Patient Sign-In Screen" for details.)
Publish to Disk as WMV - (Microsoft Expression Encoder Free or Pro required.) Use this option to save the filmstrip as an WMV video file on your computer that you can view on nearly any device with a media player. After entering a job name and description, the video will be saved to the Output folder of the Data Files location specified in your Edge Animation settings. (See "Set Up Edge Animations" for details.) You can then navigate to the Output folder to view and manage your new video. In addition, you can add Edge Animations videos that you have published to your patient sign-in screen. (See "Set Up Patient Sign-In Screen" for details.)
Publish to Facebook - (Microsoft Expression Encoder Free or Pro required.) Use this option to push the filmstrip directly to your Facebook page. After entering a job name and description, the video will be encoded and uploaded to the Facebook page specified in your Edge Animations settings. (See "Set Up Edge Animations" for details.) You can then view the video directly from Facebook. (Note that videos you send to Facebook may take several hours to upload completely.)
Publish to YouTube - (Microsoft Expression Encoder Free or Pro required.) Use this option to push the filmstrip directly to YouTube. After entering a job name and description, the video will be uploaded to the YouTube account specified in your Edge Animations settings (See "Set Up Edge Animations" for details.) You can then view the video directly from YouTube. (Note that videos you send to YouTube may take several hours to upload completely.)
Publish to Email - (Microsoft Expression Encoder Pro required.) (Only available when a patient folder was active when you opened Edge Animations.) Use this option to email a link of the video to the active patient, responsible party, or professional linked to the patient folder. After entering a job name and description, you select the email address of the recipient(s) and complete the email message. (If multiple email addresses are available, you can use your Shift and Ctrl keys to select multiple recipient addresses.) A copy of the video link and the email message will be added to the appropriate Correspondence History.
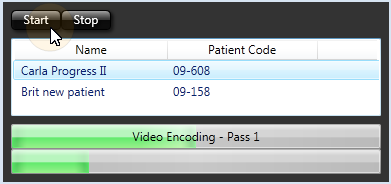
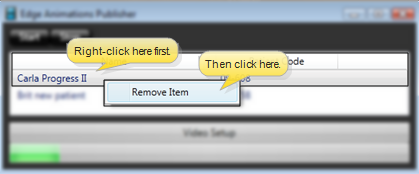
Manage Publisher - After you select your publishing output, the Edge Animations publisher window opens, so you can review the progress of videos you have selected for publishing. (You can also open the publisher at any time by right-clicking the Edge Animations icon in your system tray and choosing Open Publisher). Depending on the status of a video, you may be able to Start and Stop publishing from the publisher window, and right-click a video you wish to remove from publishing.
 Open from the filmstrip viewing area to clear the current filmstrip bar, and open a saved Edge Animations filmstrip. Or, add a filmstrip or patient image from an Edge Animations list to the end of the filmstrip bar. (See "Manage Edge Animations Filmstrip Lists" for details about saving and opening filmstrips.) You can then add additional filmstrips or images before continuing. (See "Build & Save Edge Animations Filmstrips" for details.)
 Publish from the filmstrip ribbon bar, then select how you would like to publish your video.
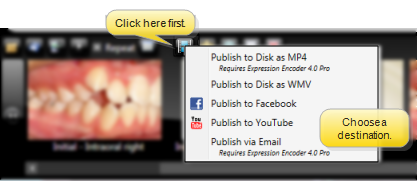
 Edge Animations icon in your system tray and choosing
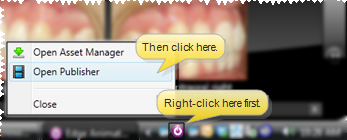

 │
│ 


