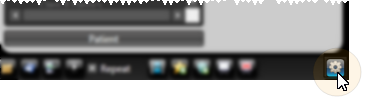
Open Edge Animations Setting![]() Click the
Click the  Settings button at the lower-right corner of your Edge Animations window.
Choose Your Settings![]() Set up your Edge Animations data file location, publishing credentials, and default volume settings.
Set up your Edge Animations data file location, publishing credentials, and default volume settings.
Data Files Set this field to a shared location where all of your videos are loaded and shared/accessed by all of the computers in your office.
Throttle Upload Enable this option, and set the field to 128 Kb/s to minimize the use of bandwidth while uploading your videos.
YouTube Authorization Click Authorize, then sign into the You Tube account you want to use for publishing videos. Note that you will also need to use the Copy Publish Logo option, below, before you can publish a video.
Facebook Location If you plan to publish videos directly to a page attached to your Facebook profile, enter the page name in the text field. (If you don't know your Facebook page name, go to your Facebook page, copy the text that appears after "www.facebook.com/" in your browser bar, and paste it into the Facebook Location text field of your Edge Animations settings window.) Alternately, you can enable the "Me" option if you want Edge Animations to post as "you" instead of posting as your page. Note that you will also need to use the Copy Publish Logo option, below, before you can publish a video.
Header Logo The graphic you select as your header logo will appear in the upper-left corner of your Edge Animations main window. To select or change your header logo, click Copy Header Logo, then navigate to the location of your office's logo graphic (or any graphic you want to use as a header), in .PNG format. The graphic file you select will be copied to the Assets folder in your Data Files location, with the filename logo-header.png. Any previous header logo file will be overwritten. You can also click the X beside the Copy Header Logo button to remove the graphic file from your Assets folder, and remove the header from your Edge Animations window. You must exit and re-enter Edge Animations to see the results of any changes you make.
Publish Logo - (Required for publishing videos you create with Edge Animations.) The graphic you select as your publish logo will appear in the lower-right corner of your published videos, and is required for copyright purposes. To select or change your publish logo, click Copy Publish Logo, then navigate to the location of your office's official logo graphic, in .PNG format. The graphic file you select will be copied to the Assets folder in your Data Files location, with the filename logo-publish.png. Any previous publish logo file will be overwritten. You can also click the X beside the Copy Publish Logo button to remove the graphic file from your Assets folder. However, note that a logo-publish.png file is required for copyright purposes if you plan to publish videos you create with Edge Animations.
Video Encoder - Click Register Files to register all files that are required for playing encrypted videos. You can also click the X beside the Register Files button to remove the registrations.
Render in Software - If your Compliance Animations and Edge Animations videos have a strange look to them, such as garbled artifacts showing on an image, enable the  Render in Software option. This will render your videos directly in the software, rather than on your monitor's video card, and produce a cleaner-looking result. However, when this option is enabled, you may have a choppier video presentation. Example video "Tearing" problem:

Edge History Category - (Applicable only if you use the Edge practice management system.) Select the Correspondence History category to use for Edge Animation videos that you email to a patient.
Microphone - Select the microphone to use for recording voice annotations with your Edge Animations videos.
Exclude Stereo (3D) Videos - Enable this option to exclude 3D stereoscopic videos from your filmstrip list. You can still download 3D videos from the Asset Manager, but you must then disable this option to select them in Edge Animations. In the Edge Animations library, these videos include the label "3D" at the end of the description.
Background Music - Select a soundtrack to play along with your animation (the track will play after the video is published). You may use any .mp3 or .wav audio file available to your computer. You set up the default audio file in your general Edge Animations settings, but you can choose a different audio file for individual videos with the filmstrip Properties settings. If you have additional audio in the animation, such as recorded annotations or voice-overs, be sure to set the background volume fairly low. To clear the background music file, click the  beside the settings field. Note that it is prohibited to use copyrighted music in your filmstrips. (See "Build & Save Edge Animations Filmstrips" for details about individual video properties.)
Volume settings - Use the slider bars to set the filmstrip audio volume. The Video Volume setting controls a voice-over track; the Background Volume setting controls the background music track; the Annotation Volume setting controls any voice recordings you have made for filmstrip images. (See "Edit Filmstrip Image/Video" for details about adding voice recordings.) You set up the default volume levels in your general Edge Animations settings, but you can choose different volume levels for individual videos with the filmstrip Properties settings. (See "Build & Save Edge Animations Filmstrips" for details about individual filmstrip properties.)
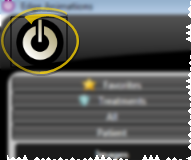
Save Your Settings Click Ok at the bottom of the settings window to save your settings. Note that many of the Edge Animations settings require that you exit and re-enter the application before they will take effect.

 │
│ 


