Trace Options
Your SmartCeph Trace Options help you configure SmartCeph to best guide you through tracing your ceph images, including selecting your calibration method. Once set up, you generally do not need to change your Trace Options very often, but you may change them whenever necessary.
 Open Trace Options Window - Select the
  Options icon from the Trace section of the SmartCeph Main ribbon bar.
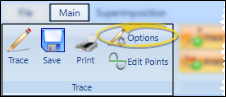
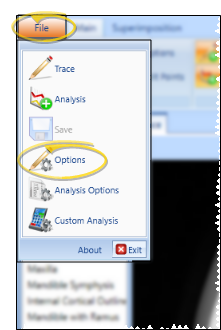
Alternately, you can select the Options icon from the File ribbon bar.
-
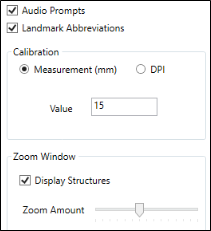
Choose Your Trace Settings - Use the Trace Options window to select your tracing prompts, calibration method, and zoom settings to use while you trace a ceph.
Audio Prompts - Enable / disable this option to choose whether you want to hear the name of the structure you are working on as SmartCeph guides you through tracing your ceph.
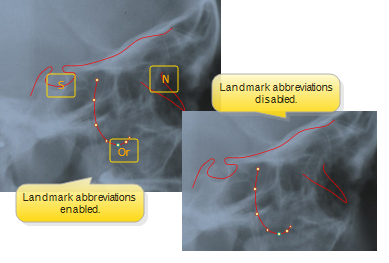
Landmark Abbreviations - Enable / disable this option to choose whether to include abbreviations of the landmarks on your tracing as you plot each structure of your ceph. You can change this setting at any time as you trace and view your ceph images.
Calibration Method - SmartCeph allows for calibrating your ceph to account for any magnification. Select how you wish to calibrate your ceph images. See "Calibration" for details
By measurement - If you scan your ceph X-Rays manually, SmartCeph can begin each trace by prompting you to mark two points a known distance apart. For this case, choose the Measurement calibration option, and enter the value to measure, in millimeters. Generally, the measurement value is the largest distance you can reliably see and measure in each image, such as 15 millimeters.
If you choose this method, be sure to have a measurable item, such as a metric ruler or scale, attached to the X-rays that can be used for calibration purposes. You will use this ruler to set the calibration before you begin tracing the ceph.
DPI Unit: - If you are using a digital X-ray with a published dots per inch (dpi) value, select DPI and enter the number in the value field. SmartCeph will auto-calibrate according to your individual unit's settings. Do not use the DPI setting if you use a scanner.
Zoom Window Options - The zoom window appears at the bottom portion of your Workspace area, magnifying the area around your current cursor position. Use this option to set the default magnification ratio for the zoom window, and choose whether to include the structure illustration in the zoom window during a tracing. You can alter this setting at any time during a tracing to adjust the zoom window magnification as needed.
-
Save Your Changes - Click Ok to save the changes you have made and close the editing window.