Needs Appointment List
The Needs Appointment tab of your grid bar lists patients that should have a next appointment scheduled, but don't. You can place patients on the list manually, or automatically track patients that need appointments by enabling the appointment required option for certain status descriptions, and entering treatment chart records that include next appointment criteria. Patients are placed in different sections of your Needs Appointment list depending upon how they were added to the list, and the available details of the next needed appointment.
Watch the movie. (Windows Media Player, an active Internet connection, and a valid Ortho2 customer login are required to run video tutorials, webinars, and training programs.)
Flag Statuses that Require Appointments - Enable the Appointment Required option for each description in your Status table that should have an appointment scheduled with your office. When you process an appointment for a patient in a status that requires an appointment, you are given rescheduling opportunities, including placing the patient on your Needs Appointment list. See "Status Table" for details.
You can open this feature in multiple ways: Use the method that's most convenient for you.
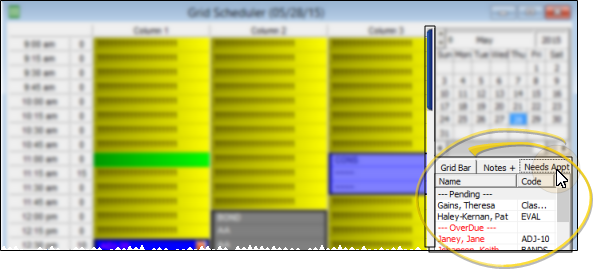
 Grid Scheduler - Open your Grid Scheduler, and click the Needs Appt tab of your Grid Bar. (If you cannot see the grid bar, click
the blue/red bar at the upper-right side of the scheduling grid to display it.)
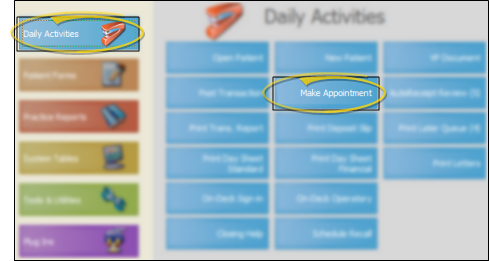
 ViewPoint main menu - Daily Activities > Make Appointment.
 ViewPoint toolbar -
  Make Appointment or
  Grid Scheduler.

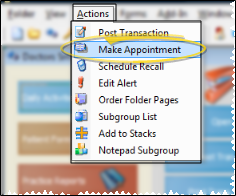
 ViewPoint shortcut menu (Option 1.) - Actions > Make Appointment. (Or, press Alt+A on your keyboard to open the Actions menu options.)
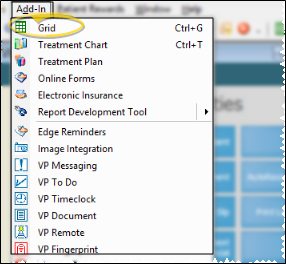
 ViewPoint shortcut menu (Option 2.) - Add-In > Grid. (You can press Alt+D on your keyboard to open the Add-In menu options.)
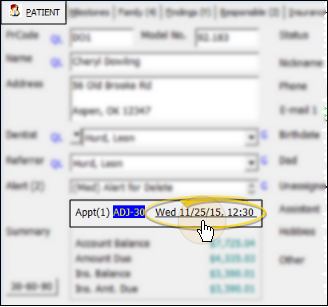
 Patient Folder - Click the next appointment date from the Patient tab of the patient folder.
Keyboard Shortcut - You can also open the Grid Scheduler by pressing Ctrl+G on your keyboard while ViewPoint is active.
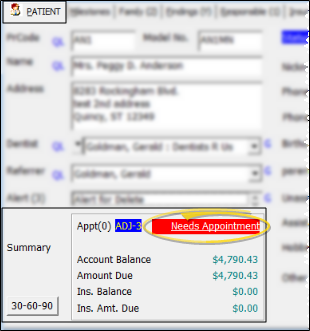
 Patient Folder - If a patient is on the Needs Appointment list, you can
click the Needs
Appointment link
on the Patient tab to open the Grid Scheduler with that patient selected in your Needs Appointment list.
 Enable / Disable Patient Filters - Only patients assigned to the doctor, office, and assistant shown at the top of your Grid Scheduler window are included in the Needs Appointment list. To
be certain all patients are included, set the filters to All.
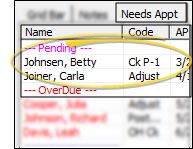
 Pending Appointments - When you create a treatment chart record that contains the procedure and date that should be scheduled for the next appointment, the patient is automatically added to the Pending section of your Needs Appointment list. You can use the right-left scroll bar at the bottom of the Grid Bar to review additional details, including the next procedure and date that should be scheduled, the patient's status, and the last kept appointment date.See "Add, Edit, & Sign Treatment Chart Records" for details.
Activate & Schedule a Patient - Click a patient name in the list to activate the patient in your Grid Scheduler. You can then manually schedule a new appointment, or use Explore to schedule a new appointment for the patient. Or, simply double-click the name to open the Explore window for that patient.
Drag & Drop to Schedule - You can drag and drop a patient from the board onto an appointment time slot in your schedule. Any related appointment messages, milestone reminders, and auto-events will be triggered appropriately.
Needs Appointments Properties - Right-click a patient name in the list, and select Properties to display the needs appointment details, including the appointment procedure, number of weeks until the appointment is due, appointment units (length), and reminder. Add or change the details as needed, then click Ok to save any changes and exit.
Remove from Needs Appointments List - Right-click a patient name in the list, and select Remove to delete the next appointment properties (procedure, weeks until due, length, and reminder). If the patient is in a status that requires an appointment, the patient will be moved to the Appointment Required Status section of the list. If the patient's status does not require an appointment, the patient is completely removed from the Needs Appointment list. Patients are automatically removed from the Needs Appointment list when an appointment for the next procedure is scheduled.
Go to Appointment Date - Right-click a patient name in the list, and select Appt Date to go to the suggested next appointment date, as specified in the needs appointment properties for this patient (described above).
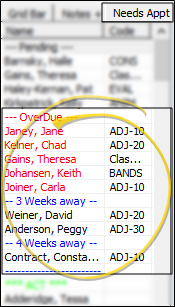
 Overdue / Dated Appointments - Patients can be added to the Overdue / Dated Appointments section of your Needs Appointment list by processing a patient's appointment without scheduling a future appointment, by dragging and dropping appointments onto the list, or by adding appointment details to a patient on the Appointment Required Status section of the list (described below). You can use the right-left scroll bar at the bottom of the Grid Bar to review additional details, including the next procedure and date that should be scheduled, the patient's status, and the last kept appointment date. Patients in the Overdue section have appointments that are either due within one week, or past due. Additional patients are grouped by the number of weeks until their next appointment is/was due.
Activate & Schedule a Patient - Click a patient name in the list to activate the patient in your Grid Scheduler. You can then manually schedule a new appointment, or use Explore to schedule a new appointment for the patient. Or, simply double-click the name to open the Explore window for that patient.
Drag & Drop to Schedule - You can drag and drop a patient from the board onto an appointment time slot in your schedule. Any related appointment messages, milestone reminders, and auto-events will be triggered appropriately.
Needs Appointments Properties - Right-click a patient name in the list, and select Properties to display the needs appointment details, including the appointment procedure, number of weeks until the appointment is due, appointment units (length), and reminder. Add or change the details as needed, then click Ok to save any changes and exit.
Remove from Needs Appointments List - Right-click a patient name in the list, and select Remove to delete the next appointment properties (procedure, weeks until due, length, and reminder). If the patient is in a status that requires an appointment, the patient will be moved to the Appointment Required Status section of the list. If the patient's status does not require an appointment, the patient is completely removed from the Needs Appointment list. Patients are automatically removed from the Needs Appointment list when an appointment for the next procedure is scheduled.
Go to Appointment Date - Right-click a patient name in the list, and select Appt Date to go to the suggested next appointment date, as specified in the needs appointment properties for this patient (described above).
 Appointment Required Status - Patients in an appointment-required status that have no future appointment scheduled are automatically placed at the bottom of your Needs Appointment list, grouped by status. Once appointment details have been assigned, as described below, the patient will appear in the appropriate Overdue / Dated Appointments section of the list.
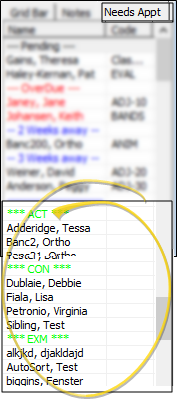
Activate & Schedule a Patient - Click a patient name in the list to activate the patient in your Grid Scheduler. You can then manually schedule a new appointment, or use Explore to schedule a new appointment for the patient. Or, simply double-click the name to open the Explore window for that patient.
Needs Appointments Details - Right-click a patient name in the list, and select Set Next Appt Details to enter the next appointment properties, including the procedure, number of weeks until the appointment is due, appointment length, and reminder. When you click Ok to save the changes, the patient will be moved from the Status section of the list to the appropriate Overdue / Dated section of your Needs Appointment list (described above).
Remove from Needs Appointments List - If the patient is in a status that requires an appointment, you cannot remove him or her from the Needs Appointment list: You must either schedule an appointment for the patient, or change the status assignment in the patient folder. ( See "Status Table" for details about the "Appointment Required" option.)
Print Needs Appointment List - Run the Needs Appointment report to see which patients with a status requiring an appointment do not have one scheduled. Among other data, the report includes the next required procedure, if available, to assist you in scheduling appropriate appointments for the patients.
![]()
![]() Patient Folder - If a patient is on the Needs Appointment list, you can
click the Needs
Appointment link
on the Patient tab to open the
Patient Folder - If a patient is on the Needs Appointment list, you can
click the Needs
Appointment link
on the Patient tab to open the ![]() Enable / Disable Patient Filters -
Enable / Disable Patient Filters - ![]() Pending Appointments - When you create a treatment chart record that contains the procedure and date that should be scheduled for the next appointment, the patient is automatically added to the Pending section of your Needs Appointment list. You can use the right-left scroll bar at the bottom of the Grid Bar to review additional details, including the next procedure and date that should be scheduled, the patient's status, and the last kept appointment date.See "Add, Edit, & Sign Treatment Chart Records" for details.
Pending Appointments - When you create a treatment chart record that contains the procedure and date that should be scheduled for the next appointment, the patient is automatically added to the Pending section of your Needs Appointment list. You can use the right-left scroll bar at the bottom of the Grid Bar to review additional details, including the next procedure and date that should be scheduled, the patient's status, and the last kept appointment date.See "Add, Edit, & Sign Treatment Chart Records" for details.![]() Overdue / Dated Appointments - Patients can be added to the Overdue / Dated Appointments section of your Needs Appointment list by processing a patient's appointment without scheduling a future appointment, by dragging and dropping appointments onto the list, or by adding appointment details to a patient on the Appointment Required Status section of the list (described below). You can use the right-left scroll bar at the bottom of the Grid Bar to review additional details, including the next procedure and date that should be scheduled, the patient's status, and the last kept appointment date. Patients in the Overdue section have appointments that are either due within one week, or past due. Additional patients are grouped by the number of weeks until their next appointment is/was due.
Overdue / Dated Appointments - Patients can be added to the Overdue / Dated Appointments section of your Needs Appointment list by processing a patient's appointment without scheduling a future appointment, by dragging and dropping appointments onto the list, or by adding appointment details to a patient on the Appointment Required Status section of the list (described below). You can use the right-left scroll bar at the bottom of the Grid Bar to review additional details, including the next procedure and date that should be scheduled, the patient's status, and the last kept appointment date. Patients in the Overdue section have appointments that are either due within one week, or past due. Additional patients are grouped by the number of weeks until their next appointment is/was due.![]() Appointment Required Status - Patients in an appointment-required status that have no future appointment scheduled are automatically placed
Appointment Required Status - Patients in an appointment-required status that have no future appointment scheduled are automatically placed 
 Make Appointment or

