Viewing and Annotating Images
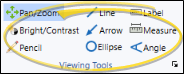
Use the Viewing Tools and Annotation Options sections of the
Compatible Viewing Modes - You can apply annotations to an image while viewing it within a static layout (not cardflow), or when the image is maximized: You cannot annotate images while importing images or while in imaging editing mode. (See "Patient Imaging Page" for details about viewing an image.)
You can use viewing and drawing tools while viewing a static (not card flow) image layout, or while an image is maximized. Some of the annotations you can make, such as free-hand pencil drawings, can optionally be saved with the image, while some changes, such as the image position or brightness, are temporary. To use these tools, enable the tool you want to use from the Viewing Tools section of the ribbon bar, then click and drag your cursor as described below. Before applying any annotations, please consider these important points:
Before applying any annotation tool, you can adjust the size and color with the tools in the Annotation Options section of the ribbon bar.
After annotations are applied, you can show / hide them with the Show Annotations tool in the Annotation Options section of the ribbon.
Saved annotations will appear with the image in all layouts except card flow layouts.
If annotations are showing on an image, they will be printed, copied, or exported with the image.
Saved annotations cannot be changed, but can be removed with the Undo and Undo All tools in the Annotation Options section of the ribbon. (To permanently remove an annotation, be sure to save the image again.)
 Pan / Zoom - Enable this tool, then left-click and drag an image to move it within its window, or right-click and drag your mouse to make the image appear larger or smaller. You can also use the tracking wheel on your pointing device (i.e. your mouse) to "zoom" an image. These changes to the image are temporary: When the image is refreshed, it is automatically restored to its original settings. You can, however, make permanent changes to the image with the image editing tools.
 Bright / Contrast - Enable this tool, then left-click an image and drag to the right to increase the brightness, or drag to the left to decrease the brightness. You can also right-click and drag right to increase the contrast, and drag left to decrease the contrast. These changes to the image are temporary: When the image is refreshed, it is automatically restored to its original settings. You can, however, make permanent changes to the image with the image editing tools.
 Pencil Drawing - Enable this tool, then click and drag to draw free-hand on an image. You can optionally save this annotation with the image.
 Line Drawing - Enable this tool, then click and drag to draw a straight line. You can optionally save this annotation with the image.
 Arrow - Enable this tool, then click and drag to draw an arrow on an image. The point of the arrow is at the tip of your cursor.
Ellipse - Enable this tool, then click and drag to draw a circular shape on an image. You can optionally save this annotation with the image.
 Label - Enable this tool, then click on an image where you would like to add descriptive text, and type your message in the box that appears. Or, click an existing label to move it on the image. Due to font sizing, labels are often best viewed when the image is maximized. You can optionally save this annotation with the image.
 Measurement - Enable this tool, then click and drag to measure a distance on the image. By default, the distance is calculated using the image DPI. You can, however, can use the Calibrate tool in the Annotation Options section of the ribbon bar to adjust the calculation for this image. You can optionally save this annotation with the image.
 Angle - Enable this tool and select the image to work with. Then, click to select the first point of the angle. Drag your cursor, and click to select a second point. Finally, drag and click the third point. An annotation that includes two lines and the measured angle between them is added to your image. You can optionally save this annotation with the image.

Use the Annotation Options section of the ribbon bar to adjust the color and size of the drawing tools found in the Viewing Tools section of the ribbon, calibrate image measurements, show / hide annotations you have added to your images, and remove annotations you have previously applied to an image. Before using these options, please consider these important points:
The color and size settings are used for all drawing tools in the Viewing Tools section of the ribbon bar (pencil, angle, etc.) until you choose to change them again.
The Calibrate tool should be used with extreme care to assure accurate measurement. Calibration adjustments affect the current image measurement only: The tool is restored to its original DPI default when the image / page is refreshed.
The Undo and Undo All tools remove annotation(s) you have applied to the selected image, even if those annotations have previously been saved. To permanently remove annotations, you must save the image again.
Color - Click  Color, then choose the color to use when annotating the image.
Size - Use the Size field to adjust the width of the annotation tool you are using.
Calibrate Image - (Use with care.) If your annotation measurements do not appear to be correct, you may need to use the  Calibrate tool to re-calibrate the measurement scale for the image. By default, measurements use the DPI of the image. If you want to use a different scale, click Calibrate, then select the DPI option, and enter the appropriate DPI setting. If your image includes a standard measuring scale, such as a ruler at the edge, you can instead select the Measurement option. You are prompted to click and drag a sample line on the image that corresponds to the measurement value. Edge Imaging will then calculate the appropriate DPI for this image. You can also click the Reset link to return the image to the default calibration. Calibration changes affect this image only, and measurements already in place on the image will not change to reflect the new scale.
Show / Hide Annotations - Enable / disable this option to show / hide the annotations you have made to all images on the current layout.
Undo / Undo All - Click  Undo Last (or press Ctrl-Z) to erase the most recent annotation you have applied, or click
  Unto All to erase all of your annotations from the image. The Show Annotations tool must be enabled before you can use the undo tool. In addition, if you have saved annotations to the image, and then use Undo, you must save the image again to permanently remove the annotations from the image.